
Plasmid Handling and Storage
Addgene recommends the following steps to ensure proper handling and storage of your plasmids for future use. If there is an issue with your plasmid, please notify Addgene within 30 days of receipt.
For information on how to store plasmid kits, please check out our kit handling instructions. For information on the storage and handling of other Addgene materials, see our additional recipient instructions page.
Storage
Bacterial Stab
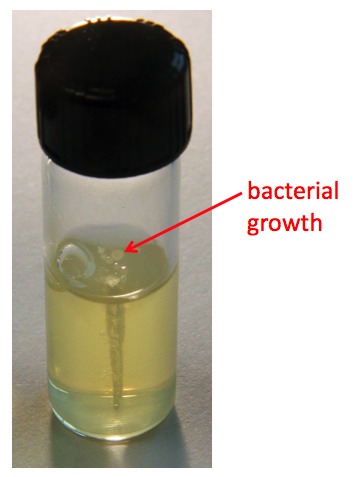
Addgene ships plasmids as transformed bacteria in stab culture format. A stab is a type of Luria Broth (LB) agar media, similar to a standard LB agar plate. Unlike an LB agar plate, a stab culture is created by piercing the LB agar with the bacteria instead of spreading it on the surface. The bacteria in a stab culture grow up and out of the puncture point to spread across the surface of the stab culture. A typical stab culture with visible growth is shown in Figure 1.
Short-term storage
Stab cultures should be stored at 4 °C upon receipt. The bacteria in the stab is guaranteed to live for at least two weeks when stored at this temperature. You should plan to purify your plasmid and create a glycerol stock for long-term storage within two weeks of receiving your stab.
Long-term storage
Within two weeks of receiving your bacterial stab, you should purify the plasmid and create bacterial glycerol stocks for long-term storage at -80 °C. Purified plasmid DNA can be stored at -20 °C.
To prepare your glycerol stock, please follow Addgene’s protocols below.
- Streak bacteria for single colonies — use your bacterial stab to streak bacteria onto a plate and isolate single colonies.
- Inoculate an overnight liquid culture — use a liquid culture to grow enough bacteria for plasmid DNA purification and for creating glycerol stocks.
- Create a glycerol stock — use bacterial glycerol stocks for stable long-term storage at -80 °C.
Watch our video below for step-by-step instructions on how to store your plasmids from bacterial stabs.
Liquid DNA
Your plasmid has been provided as a DNA suspension in a microcentrifuge tube. Storage recommendations depend on the amount of DNA in each sample. You can check the volume and concentration of your sample in the tube label.
| DNA Format | Total Amount (ng) | Transformation Recommendation |
|---|---|---|
| Standard DNA | 25–250 ng | Use 2 µL to transform into bacteria |
| Cloning Grade DNA | 2 μg | Use 2 µL to transform into bacteria |
| 20 µg DNA | 20 µg | Dilute to the manufacturer's recommended concentration for the competent cells you are using |
Liquid DNA (<1 μg)
Plasmids provided as standard DNA with less than 1 μg will need to be transformed and purified before use. Please follow Addgene’s protocols below.
- Transform DNA into bacteria — use 2 µL of your liquid DNA to transform into your choice of competent cells.
- Streak bacteria for single colonies — use your bacterial stab to streak bacteria onto a plate and isolate single colonies.
- Inoculate an overnight liquid culture — use a liquid culture to grow enough bacteria for plasmid DNA purification and for creating glycerol stocks.
- Isolate your plasmid DNA — use a commercial kit for easy plasmid isolation. Addgene also provides a protocol for plasmid purification without a kit.
Short-term storage
Store at 4 °C upon receipt and for up to two weeks.
Long-term storage
You should plan to transform your plasmid in competent bacteria and create glycerol stocks for long-term storage at -80 °C within two weeks of receiving your plasmids. You can also transform and purify plasmid DNA for storage at -20 °C. Please minimize the number of freeze/thaw cycles.
Read our protocol for creating glycerol stocks from an overnight culture.
Liquid DNA (>1 μg)
Cloning-grade DNA and other liquid DNA formats containing more than 1 µg of DNA can be stored for longer periods under short-term storage conditions.
Short-term storage
Store at 4 °C for up to four months.
Long-term storage
For more than four months, freeze at -20 °C. Please minimize the number of freeze/thaw cycles.
DNA on Filter Paper
Your plasmids have been provided in the form of DNA on filter paper. Addgene provides you with two spots of 10–50 ng of DNA for each plasmid.
To recover your plasmid:
- Use a clean razor blade to cut out one of the circles containing your DNA.
- Immerse the circle in 30 µL of TE and pipette to mix.
- After waiting for at least 10 minutes, use 2 µL to transform competent bacteria.
Short-term storage
DNA on filter paper can be stored at room teperature for up to two weeks, or at 4 °C for more than two weeks. We recommend you recover your plasmids within two weeks.
Long-term storage
Within two weeks of receiving your new Addgene plasmid you should create a glycerol stock.
To prepare your glycerol stock, please follow Addgene’s protocols below.
- Transform DNA into bacteria — use 2 µL of your liquid DNA to transform into your choice of competent cells.
- Streak bacteria for single colonies — use your bacterial stab to streak bacteria onto a plate and isolate single colonies.
- Inoculate an overnight liquid culture — use a liquid culture to grow enough bacteria for plasmid DNA purification and for creating glycerol stocks.
- Create a glycerol stock — use bacterial glycerol stocks for stable long-term storage at -80 °C.
Plasmid Purification
After proper short- and long-term storage of your new Addgene plasmid, you may wish to purify the plasmid DNA out of the bacteria. Please see Addgene’s protocols below for isolating DNA from an overnight liquid culture.
- Inoculate an overnight liquid culture — use a liquid culture to grow enough bacteria for plasmid DNA purification.
- Isolate your plasmid DNA — use a commercial kit for easy plasmid isolation. Addgene also provides a protocol for plasmid purification without a kit.
Plasmid Verification
After isolating your new plasmid, Addgene recommends verifying the plasmid by diagnostic digest or sequencing before beginning any experiments utilizing it.
Please follow the Addgene protocols below for guidance on plasmid verification, including how to select the proper restriction enzymes for your digest, analyzing your plasmid sequencing, and troubleshooting tips. We also have information for selecting or designing sequencing primers and a tool for analyzing your plasmid sequence. If there is an issue with your plasmid, please notify Addgene within 30 days of receipt.
- Perform a diagnostic digest — verify backbone and insert sizes.
- Sequence your plasmid — verify key regions of the plasmid using DNA sequencing and compare these to sequences those Addgene has performed on the plasmid.
Search addgene.org for the catalog number of your plasmid for any recomended protocols from the depositor.
Citations in Future Publications
The plasmids you have received were created by your colleagues. Please acknowledge the Principal Investigator, cite the article listed on the plasmid datasheet, and include the Addgene plasmid number in future publications.
Contact Addgene
Thank you for requesting plasmids from Addgene. If you have questions or would like to speak with an Addgene scientist, contact us at [email protected].
Credits
- Contributing Authors
- Written and reviewed by the Scientific Curation and Scientific Applications team at Addgene.
- Last Updated
- Content last reviewed on 9 June 2026.