
Using a Light Microscope
Intro to the Lab Bench
-

- Check out more protocols and videos to help you get started in the lab!
Introduction
Microscopes are emblematic of biological research and are found in many different types of laboratories. These tools allow you to observe specimens much smaller than you would be able to with your naked eye, like microbes in a drop of pond water or the cells in your cell culture dish. Microscopes come in a huge range of shapes and sizes - from phone-sized, foldable microscopes that aren't very powerful (but are cheap and accessible) to massive transmission electron microscopes that allow us to see cellular components with science-fiction levels of detail. You can take entire courses on microscopy and still have more to learn, so, for this protocol, we'll focus on one of the most common types that you're likely to encounter: the compound light microscope.
As the name suggests, light microscopes take advantage of the physical properties of light to detect small objects. Two of the most important properties of a microscope are magnification (the ability to make an image larger) and resolution (the ability to distinguish between two discrete objects). Figure 1 depicts an image of a compound light microscope with the main components labeled:
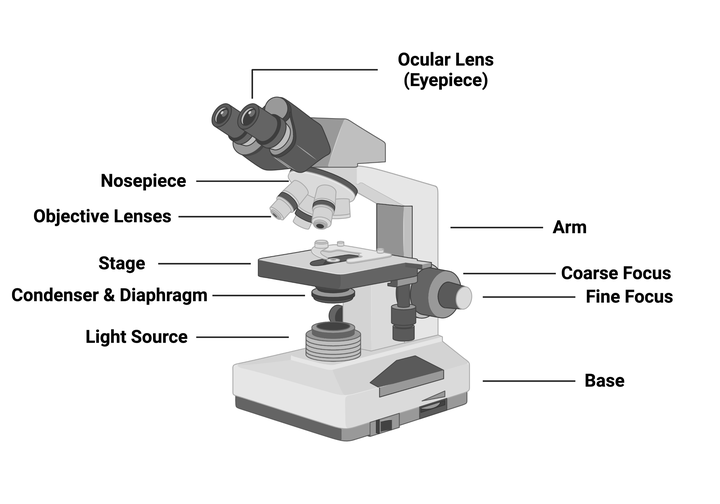
- Base
- Light Source
- Condenser and Diaphragm
- Stage
- Objective Lenses
- Focus Knobs (Fine and Coarse)
- Nosepiece
- Arm
- Ocular Lens (Eyepiece)
The route the light follows from the source to your eyes is called the light path. Light travels from the light source through a condenser that helps concentrate the light onto the sample, and then through the sample. However, some of that light won’t make it through the sample because different components of the specimen will refract and reflect the light. These differences create contrast, which allows you to distinguish objects within the sample. You can increase contrast by a) adjusting the aperture of the condenser diaphragm to limit the amount of light hitting the sample or b) using dyes or stains that add color to some components of the sample but not others.
The light that does pass through the sample then travels through the objective lens which magnifies the image, then the ocular lens, where the image is further magnified before it finally reaches your eyes. These lenses determine the magnification of the image and the resolution your microscope can achieve. You achieve the highest resolution when your image is in focus, which you can control using the focus knobs on the side of the microscope.
You may be wondering why there are multiple objective lenses. Each objective performs essentially the same task but has different magnifying powers. When you look at the side of an objective, you will see several pieces of information, but the most important (for now) is the magnification power, such as 4x, 10x, or 20x. A 4x objective magnifies the image four times the actual size, the 10x objective magnifies it 10 times, and so on.
The ocular lens also provides magnification and the power should be provided on the microscope; often this lens provides 10x magnification. To determine the final magnification of your image, multiply the magnification of your objective lens by the magnification of your ocular lens. For example, if you observe something using the 10x objective and your ocular lens is also 10x, you would actually be seeing a 100x magnified image of that object!
Equipment
- Light Microscope
- Prepared Slides (or other sample that can fit on a microscope stage)
Reagents
None needed
Procedure
-
Set up your microscope by removing any protective cover that may be on it and plugging in the power source for the light.
Pro-Tip
If you have to move your microscope around the lab, be sure to carry it with two hands - one hand supporting the base and the other holding the arm - or use a cart. - Revolve the nosepiece so that the lowest power objective is directly over the stage. It is best practice to start with the lowest power objective to find your sample.
- Place your slide (or other sample type) on the microscope stage. If using a slide, you can secure it into place using the metal clips on the stage.
- Turn on the power source and use the stage arm to move the stage so that the light shines onto your sample.
-
To ensure that your sample is adequately illuminated, look through the eyepiece. Adjust the power of the light source so that you can look through the eyepiece comfortably. Then, close down the diaphragm and use the coarse focus adjustment knob (the larger of the two focus knobs) until you can see the edges of the aperture are in focus. Center the aperture in your field of view and then slowly open the diaphragm until the edges are just out of view.
Pro-Tip
Looking through a microscope’s eyepiece can take some practice. Try to keep both eyes open and adjust the position of the eyepiece so that you can see your image through both sides. - Once you are happy with the lighting, use the coarse focus knob to bring your sample into focus. Once your sample is in focus, use the stage arm to move the stage (and ultimately your slide) until your field of view is centered on a region of interest. If needed, you can also use the fine focus knob (the smaller of the focus knobs) to make minor adjustments to the focus.
- After you are happy with the positioning and focus of your image on the lowest magnification, you are ready to move up to the next objective. Take your eyes away from the eyepiece and carefully revolve the nosepiece so that the next objective is in position over your sample. As you increase magnification, you will notice that the objectives get larger. Be careful to avoid hitting your sample with the objective!
-
Once on the higher objective, you will likely need to re-adjust lighting and focus. Increase the power of the light source by opening the diaphragm so that you can easily see your sample. Then use the focus knobs to bring the sample into focus.
Pro-Tip
As you increase your magnification, remember that the objectives are larger. Adjust your focus slowly so that you don't accidentally hit your slide and risk damaging the lens or your sample. - You can repeat steps 7 and 8 with progressively higher magnification lenses.
- Depending on why you are using the microscope you may wish to record your observations. Some microscopes have digital cameras attached to them that allow you to capture images directly to a computer, but many microscopes do not and you may have to dust off your drawing skills. Regardless of your image capture method, be sure to record the magnification used, any stains used in your sample, and sample information so that you or others can interpret your images in the future.
Conclusion
Like any important laboratory instrument, you should be sure to take care of your microscope. Bumps, scratches, and dust can easily impair microscope performance. Be sure to clean up your work area and microscope after use and store the microscope appropriately.